
ByteSize Bulletin: Using Newsletters in Parent Square
- Jan 9
- 4 min read
By: Rebecca Juereca, North Garland High School
More than ever, we need quick and efficient ways to communicate with parents and our students. One way we can achieve this is by using newsletters to keep all parents and students on the same page with what they will be learning for the week, any assignments due, homework, quizzes, tests, and even tutorial times.
In today’s digital learning environment, parent square has become essential for communication in Garland ISD. This post will explore how it works and how you can use it effectively in your classroom to have clear communication with parents and your students by creating a newsletter. Furthermore, in this blog post, you will learn how to create a Newsletter with premade templates in the Studio Editor. Then, you will learn how once you create your first newsletter, you are able to reuse that template and update as needed for parents and students to stay informed, saving you time.
First of all, ParentSquare is known as a 21st century school home communication tool. It allows for seamless communication between parents, staff, and administrators. This tool helps to support teachers by communicating what is going on in the classroom on a weekly or monthly basis. As a teacher, you can now share this newsletter letter with parents and also students. Then, parents and students can appreciate the post or reply to you with any questions. Once you have made your first newsletter, you can duplicate it and change the information inside according to the needs for the week. Let’s begin with the end in mind, here is a weekly update example for my MST Chemistry class.
Now, let's get started on setting up our first newsletter! Travel to ParentSquare which is located under staff apps.

Once you are logged in through Google, you will click the new post red button.

Next, you will change the method from post to the studio editor. Once you are there, you see a lot of pre-made templates for you to start your newsletter creation. Let’s click on the light blue title for an example.

In this section, you will be able to add many things to personalize your newsletter. In regards to adding content, you are able to add: headers, titles, paragraphs, images, videos, button links, or a divider. In regards to design, you can change the background color, fonts, and the title.
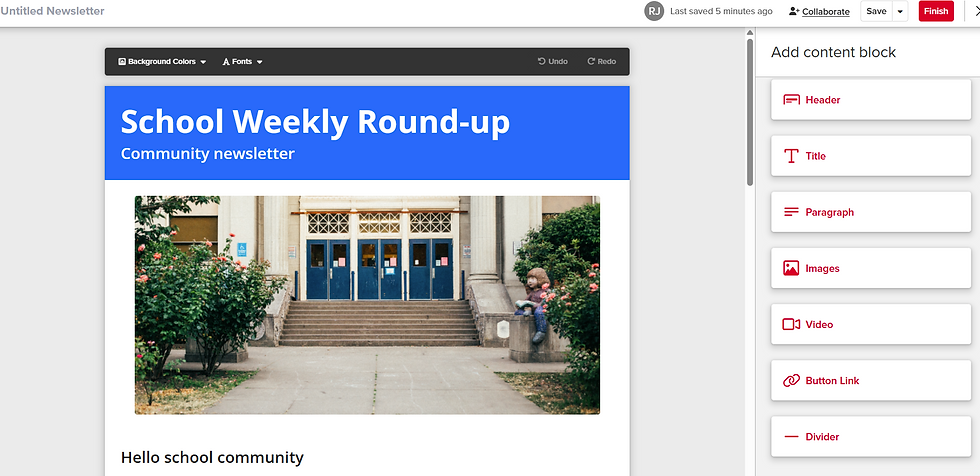
Now, you can edit the body as needed. Delete sections or add the content block based on what information you want to share with your parents and students. The sections that I include in my weekly newsletter includes: Title, Week in Use, Learning overview/ TEKS, Due dates/ assignments, Homework, Supplies, Tutorials for the week, and Questions/ contact.
Once you have edited to your liking, give the post a title in the subject line and assign it to the classes you wish to send it To. Then, you can also adjust Who Should see this? You can check the boxes for parents, students, and staff. With this option, you get a copy sent to your email, the parents get a copy in their home language either email, text, or app, and the students get a copy sent to their email.

Then you can see how many were notified, any comments, and if any parent or student appreciates the post. This particular week, I had 4 appreciations. If you click on the number notified, you will get further data on parents getting the post emailed, text, app, or if they viewed the post!

At the bottom of the screen, you are able to see each category in separate columns: emailed, text, app, or if they viewed the post. From there under the Email Status column, you are able to sort by: bounced, clicked, delivered, duplicate email, N/A, opened, or spam report. From there under the Text status column, you are able to sort by:clicked, delivered, duplicate, landline, N/A, not delivered, or sent. From there under the App Status column, you are able to sort by: delivered, N/A, or sent. See the example below with parent and student information blacked out.

The best part about making the newsletter once is you are able to DUPLICATE the post and modify it from week to week to keep your parents and students informed of all things relating to your class! Just go to the original post, click the gear for settings, and then duplicate. Once you are in, you just click edit newsletter, add anything new. Then, give it a title in the subject line, and post as before.

Once again, more than ever, we need quick and efficient ways to communicate with parents and our students. I hope you can now see that we can achieve this by using newsletters to keep all parents and students on the same page with what they will be learning for the week, any assignments due, homework, quizzes, tests, and even tutorial times. Give this a try and you will see the parents interact and appreciate the communication from week to week!
I used AI for brainstorming only and crafted the content myself.