
Dive into Seesaw!
- Apr 9, 2025
- 5 min read
by Emily Flores, Stephens Elementary
In today’s highly digital learning environment, Seesaw has become an essential tool for capturing student’s learning, promoting digital citizenship, and partnering with families. This post will explore what Seesaw is, how it is operated, and how it can be used effectively in a classroom.
What Is Seesaw?
Seesaw is an online learning platform that allows teachers to create interactive lessons or activities for students and gives students the opportunity to respond to the lesson or activity in a variety of ways.
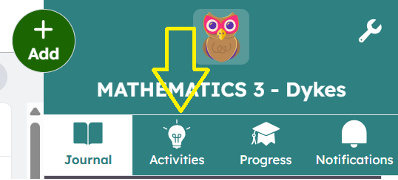
Why Use It in Education?
Teachers can use Seesaw to provide practice opportunities for a newly learned skill, assess students' understanding of a previously learned skill, differentiate station activities, or catch students up who have missed whole group lessons.
Teachers can create their own activities or browse the Resource Library for pre-made activities. When teachers create their own activity they can upload various items to the activity such as images, videos, links, and pdfs. The activities can then be organized into groupings called “Collections”. This feature allows for easy management of the activities. Activities can also be scheduled to become “live” at specific times and on a specific day. Teachers can also select specific students to assign activities to. This allows for differentiated instruction and is a great tool to utilize during independent stations. Seesaw also provides question types that can either be assigned as a “self check” or “assessment”. Students can use the “self check” to check work before submitting and correct any misunderstandings. When students take an “assessment”, Seesaw will grade the assessment and then group students based on their scores. Both types of assessments provide students with more data that can be used to influence future instruction or small groups. When teachers check student activities they have the ability to add comments for the students to see or send the activity back to the student if there is anything that is missing or needs to be redone. This feature allows for instant feedback to the student about their work.
Students can use Seesaw to practice previously learned skills, showcase their learning in various subjects, and communicate appropriately with their peers.
When students respond to an activity, they can do so in a variety of ways. Students can create using the drawing tools and shapes, type a response using the text feature, explain their thinking through voice recordings or videos, as well as upload pictures of paper and pencil work. Students' activities will be saved in their “journal”. As students respond to their learning through the activities, the “journal” becomes a digital portfolio that shows the progression of learning. Students also have the opportunity to respond to or comment on other students’ work. This feature promotes digital citizenship and the encouragement of others.
How To: Below you will find the steps for setting up your Seesaw class and creating, searching for, and assigning activities and assessments.
Getting Started:
Step 1: Create an account by going to https://seesaw.com/ OR by using the one created by your school district.
Step 2: Once signed in, click on your name in the top left corner to see all your classes or to create a new class.
Step 3: To add students, click on the wrench tool in the top right corner and click on add students.

Step 4: To edit class settings, click on the wrench tool in the top right corner. In class settings you can edit general settings, student and family settings, class blog settings, and folder settings.

Create Activities or Assessments:
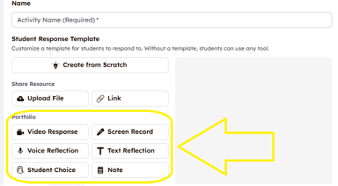
Step 1: There are two ways to create an activity in Seesaw. 1) When you are in a class, click the “green plus sign” at the top of the page and then click on “create an activity of assignment”. OR 2) click on the “activities” tab under your class icon, click “browse resource library”, click “my library”, and click “create activity or assessment”.

Step 2: Choose the student response template you would like your students to complete OR choose the assessments questions you would like your students to answer.
Step 3: Type in the instructions for the activity or assessment. Record your voice reading the instructions or add multimedia instructions or Example.
Step 4: Save your activity or assessment to a “collection” or just keep it in “my library”.
Search For an Activity or Assessment:
Step 1: Click on the “activities” tab under your class icon and click on “browse resource library”.
Step 2: Search for activities or assessments in either the “Seesaw Library”, “School and District Library”, or the “Community Library”.
You can search by subject as well as by standards and curriculum.

Step 3: Click on an activity to do one of the following: view the activity as a student, click the heart to save the activity to your library, assign the activity to students, or present the activity to the class.
Step 4: If you choose to save the activity, you can place the activity into a specific collection or just keep it in your library.
Assign an Activity or Assessment:
Step 1: When you want to assign an activity or assessment, click on the “assign” button.
Step 2: Select the class or classes you want to assign to.
Step 3: Choose whether you want to assign to the whole class or to a specific group of students.
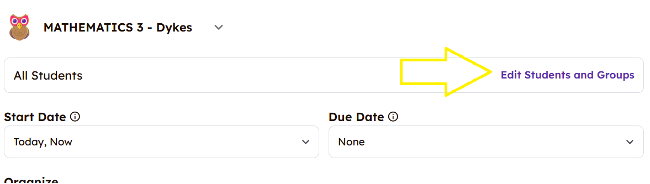
Step 4: Set a start date and a due date.
Step 5: Click the “assign now” button.

Check Below for Best Practices & Tips!
Practical Tips for Success:
Adding instructions using voice recordings to each slide(s) of the activity will provide clear direction and prevent students from asking too many questions during an independent activity or station.
Organizing your activities into collections will make it easier and faster to find items you have created or saved.
When creating activities, editing how the students will respond will limit distractions for most students and prevent “playing” with the extra tools.
When creating activities, you can always turn off the “add an extra page” option for students. Again, this will prevent “playing” with the extra tools.

By incorporating Seesaw into your teaching practice, students can build a portfolio of their learning. As a teacher, you can connect with families and build a rich community of encouraging learning across all subjects. Give it a try, and watch how it enhances learning in your classroom!
Additional Resources:
Seesaw has so many amazing features and resources that can be utilized in the classroom to promote a rich learning environment. It can be overwhelming, sometimes, trying to utilize all of them. However, the best way to get started creating a Seesaw community in your classroom is to just DIVE right in!
